
Pattern: Self drafted body. Sleeves taken from Waugh's Cut of Women's Clothes.
Fabric: 100% cotton twill, rich green, with a very soft hand (feels almost like a low pile velvet!). The petticoat is 100% silk taffeta of varying stripes in golds, greens, and browns.
Measurements:
Chest: 38-39"
Waist: 32-33"
Back Width (garment, between armhole seams): 12"
Back Width (body, between arm sockets): 14"
Back Length, garment (from top to natural waist): 12.25"
Back Length, body (nap of neck to natural waist): 16.25
Shoulders: 16.5"
Torso length, side (from underarm seam to bottom): 8.25"
Front Length: 13"
Bicep: 13" max
Sleeve Length (inside curve): 18.5"
Sleeve Length (outside curve): 26"
Hem: 39" at front, 42" at back.

Summary: A new drafting for a simple, late 1780s Pierrot jacket. The sleeves are full length with eyelets on the cuff, laced shut with ribbon. The body has only two pattern pieces, front and back. The back pieces are quite narrow to lend the optical illusion of a narrow back.
I did this version in a soft cotton twill, single face. The surface is very soft, almost like a low pile cotton velvet. The jacket is fully lined in gold/tan silk. The center front closure is done is pins (in the pictures, the pins are placed horizontally to the body, making them practically invisible)
*See the bottom of the post for more completion photos
Construction
The entire jacket has 5 pattern pieces:
- Front
- Back
- Shoulder Strap
- Upper Sleeve
- Under Sleeve
As such, construction is pretty straight forward depending on the technique you wish you to use when setting in the sleeves. I chose the rather more complicated "sandwich" method of setting in the sleeves.
I'm not sure if there is already an established term or phrase for this 18th century (and possibly earlier?) method of setting in sleeves. It involves fitting the top of the sleeve over the shoulder lining piece, wrong sides together, and then top-stitching the outer shoulder strap over everything to finish. The result is that the seam allowance of the top of the sleeve is "sandwiched" between the lining and outer pieces of the shoulder strap.
I'm not sure if there is already an established term or phrase for this 18th century (and possibly earlier?) method of setting in sleeves. It involves fitting the top of the sleeve over the shoulder lining piece, wrong sides together, and then top-stitching the outer shoulder strap over everything to finish. The result is that the seam allowance of the top of the sleeve is "sandwiched" between the lining and outer pieces of the shoulder strap.


[I recommend making detachable arms,
or shoulder shoulder arounds, that you can
attach to your dress form for this reason]


As you can see, the sheer number of pins necessary to keep everything in it's place for the hand top stitching means that you will probably want to avoid tight woven silks like taffeta and other fabrics that show pin holes badly. Lucky this cotton twill doesn't show pin holes at all, so I could go crazy.


Lining
I chose to assemble the body lining separately and then set it in around all outer edges with edge stitching (all done by hand). I did this for two reasons: 1) I really like the look of hand edge stitching. It's that extra bit of authenticity, and 2) Edge stitching creates a permanent clean pressed edge around the garment, so even after cleaning you won't be frustrated trying to iron the edge of your garment to keep the lining from peaking out, etc.
The lining for the sleeves I chose to slip stitch in by hand. I'm really not a fan of exposed seams, so I lean toward construction techniques that "bind" everything in.

(Above) The sleeves lining top, with seam allowance turned under, and pinned in place for slip stitching. The top curve of the lining is gathered into place rather than pleated.
(Below) The inside armhole, with lining finished.


The cuffs are attached to the sleeves separately, with hand whip-stitching to the lining inside, allowing them to be removed easily if desired. The cuffs are also vintage pieces, taken from an Edwardian child's dress that was too damaged to keep intact. The lace is attached to the cotton organdy base by hand, and gathered and stitched to the lining edge inside the sleeve.


The lining for the sleeves I chose to slip stitch in by hand. I'm really not a fan of exposed seams, so I lean toward construction techniques that "bind" everything in.

(Above) The sleeves lining top, with seam allowance turned under, and pinned in place for slip stitching. The top curve of the lining is gathered into place rather than pleated.
(Below) The inside armhole, with lining finished.

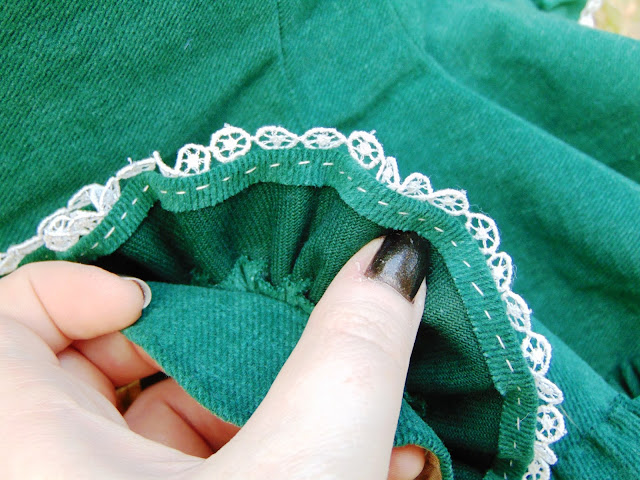
Cuffs & Peplum
The tail, or peplum, of the jacket is trimmed with a 1.25" wide ruffle of the same green twill, trimmed on three edges with a narrow vintage cotton lace. The lace is not 18th century, of course, but is likely from the late 19th century. I got it from an antique blouse I found at an antique mart that was otherwise too far gone to be salvaged.
All the work on the peplum trim is done by hand.


FINISHED


Love it! These jackets always look so pert and playful.
ReplyDeleteThanks so much! I don't post nearly as regularly a I mean to, but I hope to keep this blog going for years to come. and I too have my issues with pins lol
ReplyDeleteRight? The Pierrot has always been one of my fav designs.
ReplyDelete