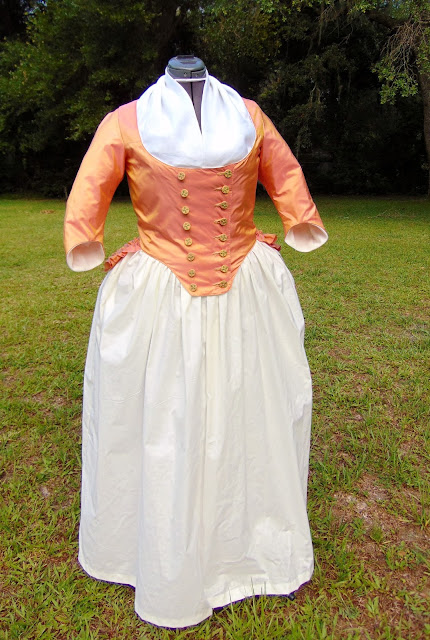
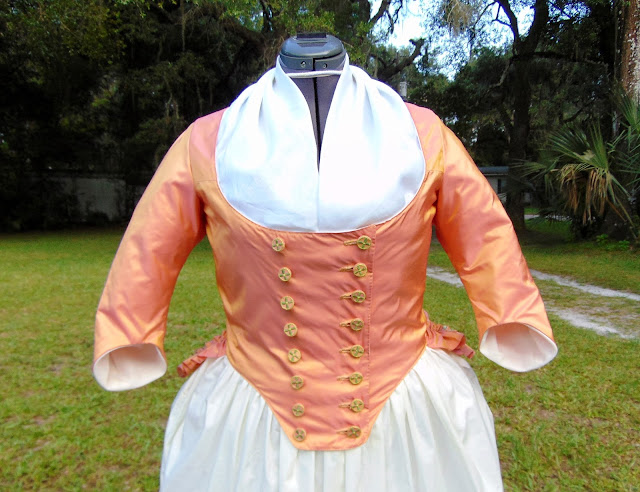
Fabrics: 100% silk Taffeta; an interesting shot silk made up of pink, yellow, and gold threads, resulting in a shifting orange/pink hue (2 yards at 54" for jacket)
100% linen, white, for lining. 100% cotton, off white, for petticoat.
Inspiration: Various jackets of the 1780s and 90s, but also the red and white striped Pierrot jacket from the Kyoto Collection
Measurements:
Chest - 43"
Waist - 35"
Hem - 40" at front, 42" at sides, 43" at back (cut to fit over large bum roll/rump pad).
Back width - 14"
Bicep, sleeves - 15.5"
~Construction Features~
- All visible stitching done by hand, including that on the back peplum ruffle
- Handmade buttonholes.
- Handmade embroidered buttons.
Pattern adjusted from an l'Anglaise bodice:
~Construction~
This jacket is actually rather simple, so there is not much to show in the way of constructions steps or details. The box pleats at the back are straightforward. Still, I will give details on the boxpleats, the peplum ruffle, and making the matching buttons
The boxpleats are formed in the lining and fashion fabric together. I did a blanket stitch over the exposed edges inside, then left them free. You can whip-stitch them to the lining to hold them in place if you wish, but it is not necessary.
To make this easier on yourself, when stitching the lining pieces together, stop your stitch a good inch above the beginning of the pleats. When stitching the fashion fabric, end your stitch 1/2" below the top of the box pleats (If you've ever made anything from Truly Victorian, you'll know all about this. It's in all of her instructions =) ) I also found turning them in easier if I snipped in to the seam allowance after stitching.
The peplum ruffle is a strip 80" long by 2.5" wide (3" before top seam allowance is turned). I used the bias edge of the fabric from my hem here, which I think came out quite well. The ruffle is actually made of two layers because I wanted a bit of contrasting color to show on the top of the ruffle. The second layer is a strip of pastel green silk shantung, 80" long by 1.75" wide. I also utilized the bias edge of this fabric so the exposed bit on the back has no raw edge to fray. I hemmed each end of the ruffle by hand then used a machine running stitch for my gathering stitch. After gathering and pinning I stitched on the ruffle by hand, then picked out the machine gathering stitch.
The embroidered buttons represent my first attempt at such a thing. I have done self-made buttons many times in the past, but this is my first time embroidering the design on them. As such, I kept it very simple, just two colors; a flower inside a circle.
I traced out circles to accommodate the actual button blank I would be using and the extra needed for the wrapping. I embroidered all the pieces before cutting them out.
(below) 16 buttons. The toothpicks were to help hold them for glue application on the back. On the left you can see one of the blank plastic buttons I used to cover.
Now, the actual placing of the embroidered silk on the button is where it gets less than historically accurate. Rather than using a flat wooden blank and making my shank out of the tightly cinched fabric (the usual method) I used a plastic button that already had a shank. I cinched the fabric on, short enough to allow the existing shank to still be accessible, then wrapped up the exposed silk edges with a great deal of stitching.
I decided to do it this way because I don't like the fat fabric shank that results form the usual method. It tends to spread the buttonholes open more than I would like. Also, I have about a hundred of these flat plastic shank buttons and they are the most hideous shade of spotty yellow. Best to put them to some good use.
~Petticoat~
A simple two panel petticoat of off-white cotton. Side slits with hand stitching. The front waistband is wider than the back because I wanted the slits to sit further back during wear. The petticoat is cut longer on the sides and back to accommodate a bum roll or rump pad.
~Finished~
cc


No comments:
Post a Comment