HIGHLY RECOMMENDED. I love this pattern and will definitely be making it up again =)
Fabric: 100% Cotton, drapery weight. Pattern is a dark blue background with a pattern of orchids and small birds in shades of blue, grey, and white.
Alterations: None. I added seam allowances to the pieces (which you have to do for all the Waugh patterns, but otherwise this is made true to the size and specifications in the book. The gown is surprisingly large for an extant piece *see size below
Chest: 39"
Waist: 34"
Hip: Free
Hem: 45" at back, drag length.
Upper arm circumference: 13"
There was no much information in the Waugh book on construction methods, so I went with methods I'm already familiar with when making this style dress. The description does state that the original was flat-lined in the bodice, so I did that (even though I don't really like exposed seams.
 |
| The original diagram in the book does not have a grid. I added the grid to make drafting easier. |
So what's up with the dart?
In the original pattern, it shows the front section of the skirt with a rather deep dart. I questions some of the experts in one of my Facebook groups, and many were also confused at it's presence. It's certainly not standard, but it was on the original garment, so I decided to go with it.
In the final result, I think the dart actually helped with the rounded shaping over the hip at that point. I might be imaging it, but it certainly didn't harm anything, so I see no reason not to do it =)
The top of the skirt is shaped to accommodate the curve in the hip and the point at the center back of the bodice. I attached the skirt is small backward facing pleats
I hand stitched the boning channels over the back seams so that I could have visible top-stitching on the outside. I could have just sewn the channels to the seam allowances, but I wanted the more defined look at the back that comes with top stitching through all layers
The Ruching
This was actually the first time I ever made rushing with the "unruffled edge". Meaning, with the stitching right at the very edge. I love the result, but it was a lot of work. I didn't want machine stitching showing anywhere, so I had to apply it all by hand. All told, making the ruching and applying it by hand was about 15 solid hours of labor.
The ruching is 100% silk dupioni, but the weave is pretty tight and you can't see much slubbing when it's all ruffled up this way.
The Petticoat
There's really nothing special about the petticoat. It's a unshaped panel of silver-white silk, laundered, with a drawstring waist. It isn't as wide as it should be for the period, but since only the front of the petticoat is visible during wear, it really wasn't an issue. I considered making a matching petticoat for this dress, but since the pattern is already so bold and busy, I felt it would be too much visually.
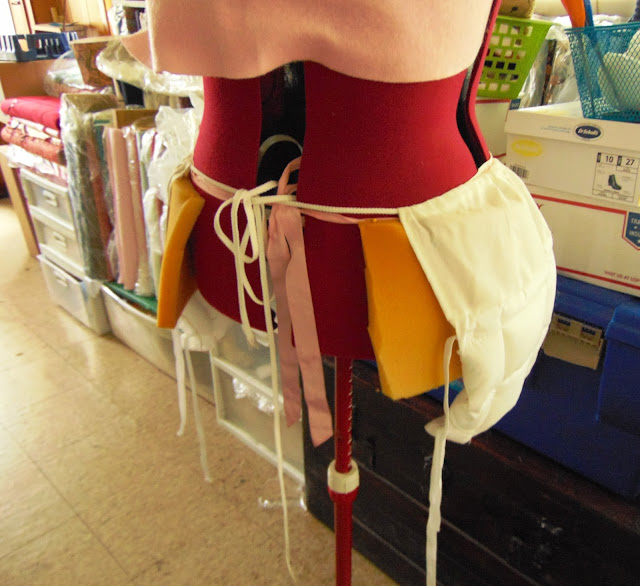
LOL. Below you can see my rather shoddy methods for giving my modern dress form a more 18th century silhouette. The ideal method would have been to put stays on the dress form, but I don't happen to have any at the moment, so felt and pieces of form had to do. =)
~Finished!~


It's beautiful. Are the closest and pattern true to the period? I'm wondering how to choose my materials? Ty. Linda
ReplyDeleteAre the colors and the flowered material true to the period? Hate spell check. ;))
ReplyDeleteAre the colors and the flowered material true to the period? Hate spell check. ;))
ReplyDeleteYou can find some chintz cottons from the era with this dark blue background, mostly Dutch in origin. While there were fabrics like this, I would say they were pretty rare. They would have been stupidly expensive, so if someone was going for a more "common" impression, probably not a print like this.
DeleteIt's beautiful. Are the closest and pattern true to the period? I'm wondering how to choose my materials? Ty. Linda
ReplyDeleteThanks =) I have seen extant dresses with rather ornate block prints similar to this. If you search for "chintz" 18th century gowns, you will see the sort of thing I'm talking about. This fabric is also chintz, so I would say it would have passed quite well for the period. For yardage, this took about 5.5 yards at 54" wide. The petticoat is 4 yards. =)
DeleteHi, even tho this is a very old post I just thought I'd pop in my thoughts on the "dart". In my mind I always thought it was to become a pocket slit so one could access a pair of pockets tied around the waist under everything.
ReplyDeleteYes! You're absolutely right. AT the time I was very new to these antique patterns that are taken from museum pieces, so a V shaped thing like that I immediately though dart. But no, it was definitely a slit for a pocket access.
DeleteDid you use the original size line of 1 inch with the pattern or your grid?
ReplyDeleteYes. This was my first time using this pattern, so I wanted to establish it's original size and everything. This is the waugh pattern taken right from the 1" grid, with 1/2" seam allowance. I didn't do any other size alterations.
ReplyDelete