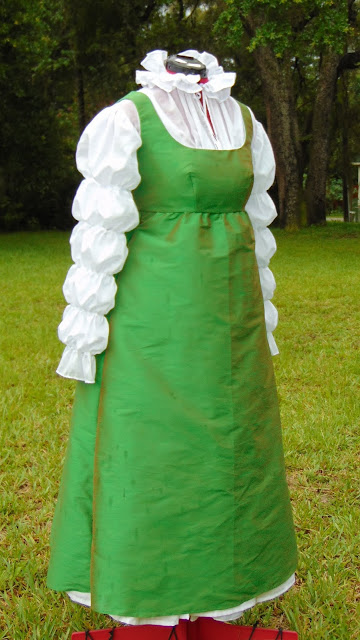
Patterns: None. Self drafted.
Fabric: 100% cotton voile, white. 100% polyester faux silk, emerald green.
Measurements:
Chest: 39"
Waist: 34"
Hem: 38" from underbust
Making the Pattern - Mameluke Sleeve Dress
Ugh. Where do I even begin? I won't try to outline the entire process because teaching is not a skill I have. I doubt the end result would be anything comprehensible. Let's just say it was a nightmare of paper consumption, rulers, and math.
The back and side pieces of the bodice are your standard shape, both flat, so there isn't really much going on there. Things get complicated when you get to the sleeves and bodice front. Unlike a previous version of this dress I made (my first, in fact) I decided to make the bodice front gathered not only at the neckline, but also at the shoulder seams. It looks much better with the entire front area gathered. Making this piece went something like this:
1) drafting the front bodice as a simple flat piece, no gathering at all (I used a Spencer jacket pattern I have to get the basic shape).
2) Decide how much of a gather I wanted. x1.5 is very light, while x3 is very full. I went with x1.66. This means an area 1.66 times the width of the flat area would be gathered to it at the shoulder, center neck, and under-bust.
3) Mark on the flat piece (cut out now in scrap pattern) where I want the gathers to start on the shoulder edge, neck edge, and waist edge.
4) Draw 5 vertical lines down the pattern from my first gather mark on the shoulder, over to the center front edge, evenly spaced (must measure and divide by 5 to figure out the spacing).
5) I then had to measure from my first gather mark on the shoulder to the bodice edge to get a number. That's the number I multiple by 1.66. Subtract the result from the original number and that tells me how much I will be increasing the width of the bodice. Divide number by five (those five lines, remember?)
6) I now have to cut the pattern piece along all five lines and spread them away from each other evenly, by the same amount (for me, it was 1").
7) Do this over another large piece of paper, taping each new "section" down as you go. Trace all around. The tracing you have made on the new paper is now the gathered front bodice piece.
Now that I've just proven what a miserable teacher I am ^ (seriously, there are some really great books out there on pattern grading and drafting. Buy them. I did), let's just see more pics of the final result:
This dress is sheer and must be worn over a under-dress or full length chemise. I had neither ready, so you can clearly see a modern white tank top underneath! A tailor does what she has to do...
Sleeves
Drafting the sleeves are pretty much the same process as the bodice, except I had to lengthen the gathered over sleep as well as widen. Same general idea. Even lines, slice and spread, tape down, then trace the result. The sleeves have a flat lining and the puffs are hand stitched to it.
Now, some might think this could be done much easier with a printer and simply "blowing up" the original flat piece. That would work if you were widening the piece by the same ratio you were lengthening it, but in this case you aren't. You could try to do that expansion yourself in some computer program and then print out the result, but once you then tape all those pieces together and cut, you really haven't saved yourself much work (and imagine how angry you'll be if after all that, the piece doesn't match up!)
Despite all my frustration, I now have a good pattern to reproduce this dress in the future. Granted, I only have it in the one size, but at least I now have a base for future grading.
Jumper Dress
There isn't really much to say here, as dresses don't get much simpler than this. It's a standard flat bodice with front darts and a back closure with buttons. The waist seam inside is bound in a bias stripe and slip-stitched to the bodice lining. The armholes are also finished with bias strips secured inside with slip stitching.


No comments:
Post a Comment