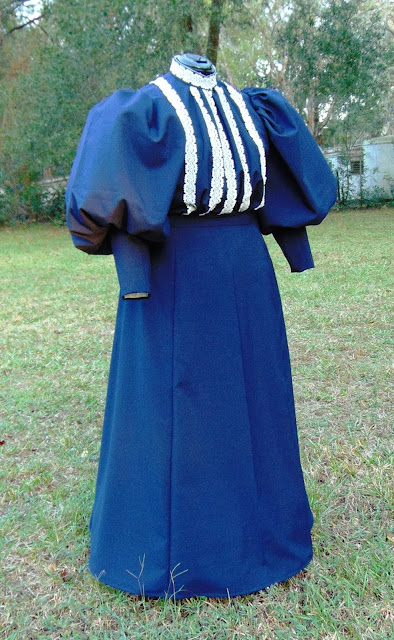
Fabric: Medium weight 80/20 blend wool, plain weave. Lining is white cotton.
Available on Etsy HERE
Measurements:Chest: 44"
Waist: 36"
Hip: <52"
Hem: 41" at front, 43" at back.
Description
A fully lined blouse with gathered front section, belted waist, and flaring peplum. The closure is at center front with hooks and eyes, overlapping 1 inch. The collar is very stiff, interfaced with a strip of woven reed material, similar to tatami? The sleeves are done with a fitted lining and a tightly gathered puff section that extends a bit below the elbows. The skirt is done is 7 gores with one box pleat at the center back framing the placket closure.
Blouse Patterns and Alterations
The shirtwaist pattern, TV494, is were I started for this blouse. I just the front, back, belt, and peplums from this pattern unaltered. But for the front, I cut the wool wider so it would be gathered the flat lining at the front, creating a puffed front bodice. But the body of the blouse is essentially this pattern. Rather than do the folding collar, I did just a simple standing collar.

 SLEEVES
Truly Victorian 495 is a collection of 1890s sleeves. Rather than using the sleeves that came with TV494, I used option #3 from the sleeve pattern. This is the largest sleeve option. I chose it because I wanted to recreate the sleeve look from this fashion plate >>>>>>
In order to help such large sleeves keep their shape, I gathered a section of stiff netting 13"x120" to the top curve of the fitted sleeve lining. The netting it attached to the lining below the seam allowance, so the netting it not in the armhole seam. I prefer this method because I dislike overly thick seams around the armhole, especially on blouses.
Here you can see the fitted lining, as well as the fashion wool on the lower section.
Now you can see the lining and pouf attached at the elbow section, ready to be gathered into the armhole. I do not gathered the pouf to the lining first, then attach to the bodice, as the pattern recommends. I find this "gathering twice" method cumbersome and messy because you create gathers to one space, then turn around and attempt to gather the same section again. The result is not neat.
Instead, I gathered the pouf to the bodice armhole first, by itself, with the lining and netting left free inside. Then I snip the armhole seam allowance so it can be tucked in, and attached the lining over it by hand. This is neater and covered the raw seam allowance of the armhole.
(Below) Inside the bodice, showing the armhole with lining gathered and slip-stitched in place. (ignore the balled up paper inside, lol) The second row of stitching you see about .75" inside the sleeve is where the netting was attached to the other side of the lining. Notice that it is close the seam allowance, but not in it.
Skirt
I've used the Butterick 3418 pattern many times. It really is a wonderful pattern and the silhouette it creates it spot on to the time period. I would recommend only a few general alterations, mostly for fitting.
This pattern runs very long. Unless you are particularly tall, you will have to shorten it. There are no "length or shorten here" lines on the pieces, however, so you will just have to mark your own, making sure they are perpendicular to the grain lines. Do NOT shorten at the hem. Since this is a gored skirt, you will end up decreasing the width of the hem is you shorten there, making your skirt narrower. You want that width to get the proper look.
Next, the pattern also runs narrow in the hip. I would recommend cutting the skirt panels one or two sizes largest than your waist measurement, than curving them in to your waist size, thus increasing the width of the hip area. This era was about small waists and big hips.
Finally, the pattern calls for a zipper at the center back. This is, of course, not historically accurate. You can simply add a standard placket at the back and do hook/eyes, or buttons.
FINISHED


No comments:
Post a Comment