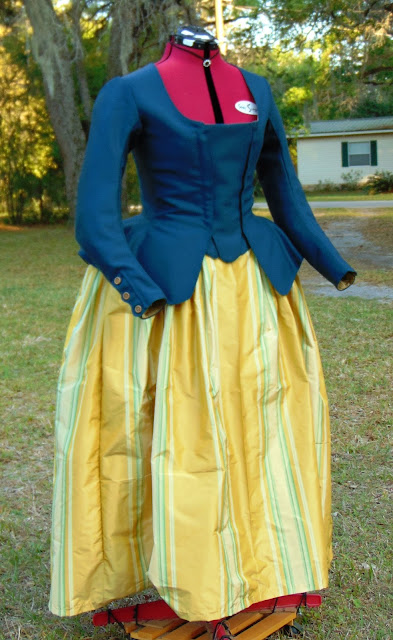
Fabrics: 100% wool, blue with a green tinge; tiny vertical ribs. 100% silk taffeta, yellow gold, with stripe pattern of light green and cream. 100% silk jacket lining, dark gold. Linen buckram for stomacher interfacings.
SOLDAvailable on Etsy HERE
Chest: 38/39"
Waist: 31/32"
Hip: Free
Hem: 37" at front, 41" at back (tbw with a bumroll).
Sleeve: 19" inside curve.
Bicep: 15" max.
Forearm: 12.5" max.
Wrist: 8" (can be altered by shifting buttons)
Back Width: 13.5", across shoulder blades between armhole seams.
I have been tweaking the pattern for some time now, and I think this jacket now represents the results where I can finally stop messing with the thing. Of course, that is until I start grading it to different sizes, then the tweaking will start all over again =/
For this one I added inside lacings rather than the visible sort that would have gone across the stomacher. . Most of the examples I've found of outside lacing going across a stomacher (functional lacing, not just decoration on the stomacher) were for more casual garments or those worn by the lower classes. Since this ensemble is a bit more upscale ($35 a yard wool! Ouch!), I decided that might be too low end or costumy. I like the look myself, but for this I was going for authenticity.
~Lacing and Stomacher~
Two stripes of cotton with eyelets and a boning channel are stitched 1.3 inches inside the center fronts. The 1.3" lap on either side allows for that much ease of fit with the stomachers I've made. For examples, if the front were laced too far closed the stomachers would not fit into the space under the lapped edges. Spiral lacing and handworked eyelets. Below is the lacing strip from the inside.
I have found several examples of this lapped edge method covering lacing strips in museum pieces.
Sometimes a trim would be used to further obscure the lap, but many were plain like this.
~Sleeves and Cuffs~
The sleeves I used for this jacket are not from the Waugh XXX pattern, but from another pattern in The Cut of Women's Clothes, diagram XXVI. I graded them up to be roomier and accommodate the size I needed, but otherwise the shaping is true to that pattern. I have always like the curved long sleeves of the 18th century.
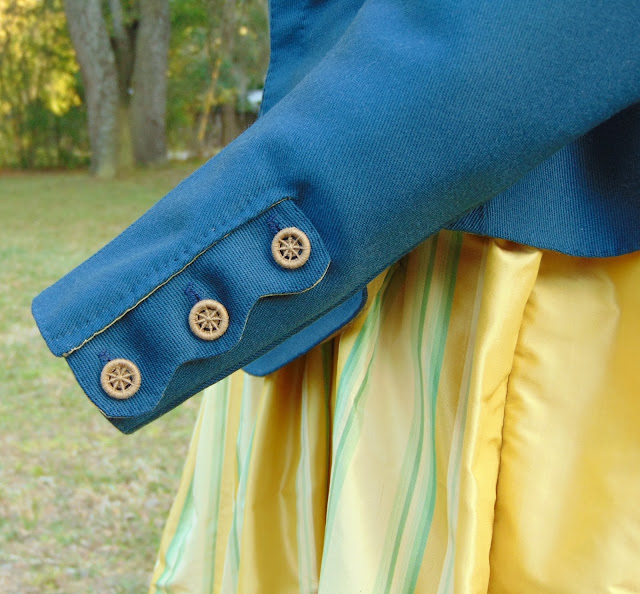
The original sleeve pattern, Waugh XXVI, did not have a cuff, so I drafted my own small flap to fit into a 4" deep slit, narrowly turned and top stitched down. The buttonholes are handworked (over the years I've completely lost my taste for machine buttonholes. I don't even do them on modern clothes anymore), and I made the Dorset Buttons using dark gold silk thread over a 5/8" plastic ring. Normally I would use a brass metal ring, but I was out of the 5/8" and didn't want to wait to order. You can't see any of the plastic, though, so...mums the word =P
For the sleeves lining, I left it free while attaching the sleeve to the jacket, then slip-stitched it in afterward to cover the armhole seam. I could have pleated the ease, as I did on the outside, but I didn't want the corresponding bulk. I spacing it out instead with gathers. (the white paper is a color aid for photography)
~Petticoat~
I cut this petticoat to be worn over a modern bum roll. The great thing about stiff taffeta is that it makes your finished silhouette appear much poofier than your undergarments would produce with a different type of fabric, lol.
I cut the back and front panel 44" long, then pressed down 4" at the center front to accommodate the shorter length there. If you haven't made an 18th century petticoat before, I highly recommend the tutorials given by The American Duchess. When you press down the excess length to the inside, you end up with an inside that looks like this (upside down, sorry, lol):
I cut the back and front panel 44" long, then pressed down 4" at the center front to accommodate the shorter length there. If you haven't made an 18th century petticoat before, I highly recommend the tutorials given by The American Duchess. When you press down the excess length to the inside, you end up with an inside that looks like this (upside down, sorry, lol):
And then the back, inside. As you can see, barely an inch is folded down here because I needed most of the length I had cut back there.
Hem, showing the hand stitching; a simple running stitch. To get a thread that matched, I pulled threads of silk from the fabric itself and waxed them. This works with silk because it's so strong, but it's particularly reliable with any other type of fabric.
Now, why fold the fabric down instead of just cutting the skirt to the shape/length needed? Honestly, I'm not really sure. I've just seen this done on so many extant petticoats that I guess they had their reasons. One could be that it really adds body to the pleats, having that second layer in there, so maybe it's for an extra little oomph of body at the top of the petticoat for thinner fabrics? Another plum side effect is that it removes all those raw edges from being inside your waistband channel. ¯\_(ツ)_/¯
~Finished~


No comments:
Post a Comment